This Vignette discusses how you can extend golem.
Project Hooks
What it is
The create_golem() function comes with a
project_hook parameter, a function run just after the
golem project creation. It can be used to modify the
project structure automatically just after its creation.
This allows you to define custom behavior when creating golem based app, that can be used for:
Adding a different front-end template in
R/app_ui.RChanging configuration options in
inst/golem-config.ymlCopying external files in
inst/app/wwwRemoving any file from the default template
etc.
How it works
The function is called after the default project has been created, and is executed in the directory of the created package. Here is a rough step by step of what happens when a project is created with golem:
- The package name is generated
- The directory that will receive the package is created
- Default golem template is copied and pasted
- R moves to the directory of the newly created project, and runs the
project_hookfunction - R moves back to the previous directory, and removes comments if needed
- Project is open
Defining your own project_hook
The best way to extend golem project hook
functionality is by defining this project_hook function in
an external package. This will allow this function to be used inside the
golem creation RStudio project creation widget:
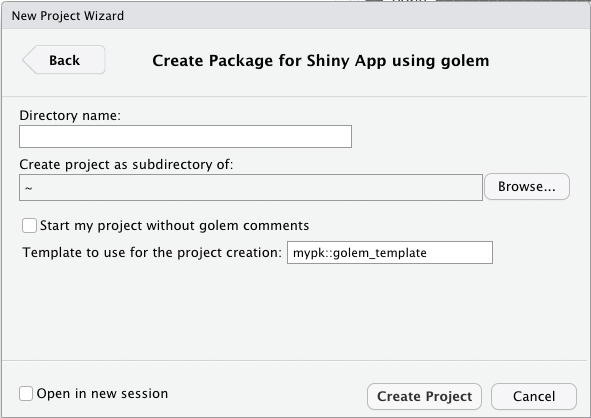
Note that inside this widget, the function should be explicitly namespaced (pkg::fun)
The project_hook function takes three mandatory
parameters, which are passed from create_golem:
-
path: the full path of the directory -
package_name: the name of the package -
...: further arguments that can be passed viacreate_golem
These parameters might not be used inside your own hook, but they need to be set in the hook function skeleton, for compatibility reasons.
Example
Here is an example of a function that can be used to remove the
dev/ folder:
no_dev <- function(path, package_name, ...) {
  fs::dir_delete("dev")
}
create_golem("ici", project_hook = no_dev)
This one will create a CSS:
new_css <- function(path, package_name, ...) {
  css_path <- fs::path_abs("inst/app/www/custom.css")

  fs::file_create(css_path)

  write_there <- function(...) {
    write(..., file = css_path, append = TRUE)
  }

  write_there("body {")
  write_there("    background-color:red;")
  write_there("}")

  cli_cat_bullet("CSS generated")
}

create_golem("ici", project_hook = new_css)
Module templates
What it is
Module templates are a way to define your own content for creating
the module script in R/. It allows to extend
golem module template functionality by creating your own
content inside the module file.
How it works
The function is called after the file(s) creation. Here is a step by
step of what happens when the add_module function is
called:
- Name is created, and so is the
R/directory if needed. - The fct_ and utils_ files are created if necessary
- The path to the module is generated
- If the file already exists, it opens the file
- If the file doesn’t exist, R creates it and the
module_templatefunction is called - File is generated, and potentially open
(Note that the module_template function is not called if
the file already exists).
Defining your own module_template
You can then define your own function inside your golem based application, but chances are you will be defining them into your own package.
Module template functions will receive, by default, the following
parameters from add_modules().
-
name: the name of the module -
path: the path to the file in R/ -
export: a TRUE/FALSE set by theexportparam ofadd_module() -
...further arguments
These parameters might not be used inside your own function, but they need to be set in the function skeleton, for compatibility reasons.
Example
my_tmpl <- function(name, path, export, ...) {
  # Define a template that only write the name of the
  # module in the file
  write(name, path)
}
golem::add_module(name = "custom", module_template = my_tmpl)

my_other_tmpl <- function(name, path, ...) {
  # Copy and paste a file from somewhere else
  file.copy(..., path)
}
golem::add_module(name = "custom", module_template = my_other_tmpl)
JS & CSS & SASS templates
What it is
JavaScript, CSS and Sass template allow to use your own functions to
add code when creating JavaScript files, JavaScript handlers and CSS or
Sass files. These templates work inside add_js_file(),
add_js_handler(), add_css_file() and
add_sass_file().
How it works
The function is called after the file creation. Here is a step by step of what happens when these functions are called:
- Name is created
- The path is generated
- If the file already exists, it opens the file
- If the file doesn’t exist, R creates it and the
templatefunction is called - File is generated, and potentially open
(Note that the template function is not called if the
file already exists).
Defining your own template
You can then define your own function inside your golem based application, but chances are you will be defining them into your own package.
File template functions will receive, by default, the following
parameters from the add_*() function.
-
path: the path to the file -
...further arguments
These parameters might not be used inside your own function, but they need to be set in the function skeleton, for compatibility reasons.
Example
my_tmpl <- function(path, ...) {
  # Define a template that only write the name of the
  # module in the file
  write_there <- function(...) {
    write(..., file = path, append = TRUE)
  }

  write_there("body {")
  write_there("    background-color:red;")
  write_there("}")
}
golem::add_css_file(name = "custom", template = my_tmpl)
Turn on the maintenance mode
What it is
From time to time, you need your application to be unavailable: database update, API changes, etc. In order to keep your app running but make it unavailable, you can use a maintenance mode. When this maintenance mode is turned on, your application will be paused and a specific page will be displayed to your users.
golem comes with a default maintenance page, and you can replace it with your own page.
How to set the maintenance mode
The maintenance mode will be turned on whenever the R process detects
that the GOLEM_MAINTENANCE_ACTIVE environment variable is
set to TRUE.
To visualize the maintenance page locally, you can run the following:
withr::with_envvar(
  c("GOLEM_MAINTENANCE_ACTIVE" = TRUE),
  {
    golem::run_dev()
  }
)
or
Sys.setenv("GOLEM_MAINTENANCE_ACTIVE" = TRUE)
golem::run_dev()
If you’re deploying on Posit Connect, you can set this variable in the setup panel.
If in command line, you can also do
export GOLEM_MAINTENANCE_ACTIVE=TRUE && Rscript -e "mygolem::run_app()"The maintenance page
golem comes with a default maintenance page, but you can override it and use your own custom page.
In order to use your own page, you need to pass either an
html_document or a tagList to the
with_golem_options function in run_app.R:
run_app <- function(
  onStart = NULL,
  options = list(),
  enableBookmarking = NULL,
  uiPattern = "/",
  ...
) {
  with_golem_options(
    app = shinyApp(
      ui = app_ui,
      server = app_server,
      onStart = onStart,
      options = options,
      enableBookmarking = enableBookmarking,
      uiPattern = uiPattern
    ),
    golem_opts = list(...),
    maintenance_page = tagList(
      fluidRow(
        h1("Under maintenance"),
        span("Coming soon...")
      )
    )
  )
}
or:
run_app <- function(
  onStart = NULL,
  options = list(),
  enableBookmarking = NULL,
  uiPattern = "/",
  ...
) {
  with_golem_options(
    app = shinyApp(
      ui = app_ui,
      server = app_server,
      onStart = onStart,
      options = options,
      enableBookmarking = enableBookmarking,
      uiPattern = uiPattern
    ),
    golem_opts = list(...),
    maintenance_page = shiny::htmlTemplate(
      filename = app_sys(
        "custom_maintenance_page.html"
      )
    )
  )
}